Friday, August 24, 2012

Back to School Night: Scavenger Hunt Fun!


This is an idea from pinterest... I LOVE how it turned out! It is such an empowering message!

I LOVE Back to School Night.  I love that the kids and families come in SO excited to see their new classrooms.  I love that every parent (whether consciously or subconsciously) asks their child “Are you excited?” and most kids either nod their little heads or say “yes!”.  It is just so nice to have the halls filled with so many happy people! 
My school has tried out many different formats for Back to School Night.  This year, we went with an “open house” format.  Parents went to an opening/welcome session run by the PTA and then were welcome to visit the classrooms to pick up disclosures, scope out the room and ask questions. 
My Kindergarten friend Jen (isn’t it funny how we become the grade we teach?) had a genius idea a few years ago to have the kids do a “scavenger hunt”- that way they could have a reason and a structured opportunity to look around, find things in the classroom (and other important things like the bathroom).
We’ve done this several times since our school opened 4 years ago.  The students (and parents) come in, we hand them the Scavenger Hunt paper and away they go!  It frees you (as the teacher) up to answer questions and just chat casually with the kids and parents.  It also allows the parents and the children to explore together. 


The first year we were at our new school, I included more places around the building-- this is what it looked like:


When they complete it, they bring it back to you for some kind of a treat.  Usually I give out “homework pencils”.  This year, thanks to pinterest, I was feeling a little fancier.  So I made these adorable treat bags!
There are a few Swedish Fish in a bag, with a note that says: “Congratulations! You’re “o-fish-ally” in First Grade!” 

I made one with gold fish crackers for my diabetic student.  I think it's just as fun!


 Their desks are ready with a “Back to School” packet. 

Included in the packet:
       ·         My disclosure
       ·         An “All About Me” form
       ·         A Volunteer Preferences Form
       ·         A confidentiality agreement for volunteers (we have a school policy that 
         everyone that comes in to help out must sign)
       ·         A welcome letter from me
       ·         First Grade Reminders
       ·         A donation envelope
       ·         A pamphlet about why reading to and with your child is CRITICAL.

(I label their packet with their name. First, it allows me to see really fast how many people came.  Second, it helps me make sure everyone gets one (I send them home the first day of school if they did not come to Back to School Night.)

 On the back table, I have a few different signs and pages.
 
First, I have a form for parents to sign in.  Sometimes you don’t get to talk to everyone, so having that list to reference is handy.
Second, I put a volunteer signup sheet.  (I give parents MANY different ways to let me know they are interested in volunteering!)
Third, I put a bus list.  If they know what bus their child rides on, they are encouraged to list it. If they don’t know, we figure it out on the first day of school.
 
 School starts Monday! Are you excited? I sure am!

Tuesday, August 14, 2012

Sight Word Discovery Game

One of my teammates, Jean, has been working all summer to create sight word games… a different game for each week.  (Just as a side note, I am so lucky to have a friend and colleague like Jean. She is so thoughtful and works so hard!  She gives a lot of herself and is willing to do anything she can to help out.  When I say she’s been working all summer to create sight word games- she has been making sets for each of us! What a sweetheart!!)

Okay, back to my story!  Jean has been making these fantastic games.  Meanwhile, I have spent way too much time on pinterest, gathering ideas.  I fell in love with the idea of Discovery Bottles (check out Tunstall’s Teaching Tidbits for more ideas- http://tunstalltimes.blogspot.com/2011/07/discovery-bottles.html ) but I really don’t want to store water bottles.  I wanted something smaller…

Flash forward to Monday.  Jean and I were brainstorming about a game she was working on (that involves Easter eggs). I pulled out some plastic Christmas ornaments out, and was struck with inspiration!
So, here is my version of “Discovery Bottles” a.k.a. “Discovery-Plastic-Christmas-Ornaments-That-I-Found-On-After-Christmas-Clearance”! (Okay, I need a better name-- any ideas?)

They are a little trickier than water bottles because of their design, but I am pretty happy with how they turned out!

(Helpful hint: use another ornament to scoop the rice-- that way you get just the right amount!)

First, I printed and cut out the 5 sight words that I am focusing on.  (Our sight words are broken into sets of 5 words that we focus on each week- and then every few weeks we review all the words we have covered.)
Put a sight word or two in the bottom.


Then I scooped in some rice.  The trick is to make sure that you put it in the side with the raised edge (you know, the part that fits inside when closed.  It makes a BIG difference when gluing it together!).

Stick the other sight words in, have some fun with it! J
Add a little more rice.


Then put a ring of glue around the edge and stick it together.  (This is a little tricky- don’t burn your fingers! Don’t use a high temp glue gun! I learned that lesson the hard way! It will warp the plastic and the two halves won’t fit together!)


I decided to add a ribbon to cover up the glue.  Because of the awkward shape, the glue isn’t quite as pretty as I’d like it- bur ribbon covers it pretty well!

Shake and find your words! It is so fun!


I think we will have a recording sheet that allows our students to collect data on a tally chart to show how many times they see each word. It will look something like this:

Sight Word Data
Put a tally mark for each time you see the sight word.
go
you
into
her
down


 Another variation could be just having them write the word each time they see it.  
I am going to make some with numerals as well!
I also think that colored rice would be super fun with the clear ornaments!
Hope this gives you some fun ideas!!
Sarah

Sunday, August 12, 2012

Math Journal: "Tools for your Toolbox"

I have been asked time and time again about math journals… How do you use them?  What is the most effective way to structure them?  Can First Graders really use them as a tool?  How do you not get overwhelmed when using them??
The great thing about math journals is that there is not just one way to use them… they can be modified to fit your style and organizational preferences.
A few summers ago, I was lucky enough to attend the National Singapore Conference in Las Vegas.  One of the sessions I attended was taught by a third grade teacher.  She told us that every time she presented a new strategy, she would tell her students “it’s just another tool for your toolbox!”  Well, I don’t know if you have ever had this experience, but the more times she said that, the more it resonated with me.  I had an idea of how to help my students understand that strategies are tools. I decided to make my tools more literal.
Instead of just having a “Math Journal”, I transformed them into “Math Toolboxes”.  When I introduce them to my students, I make a big deal about how these will be something they can keep and look back on, add to, etc.  I tell them that every tool they add this year makes them more powerful. I also let them know that some tools they will use more than others and that some will be easier for them than others.  And that the best part is that they get to choose the tool they use when solving a problem.  By the time I am done talking about it, they are DYING to get their hands on one!
With each chapter we add something to their Toolbox.  I went online and found clip art tools and labeled them with each strategy that we cover. 
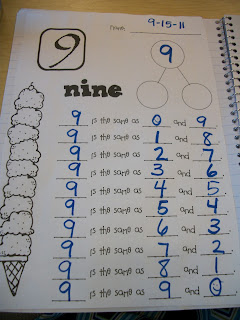
 To help build number sense, we make a chart that connects the numeral, word, and picture for each number.  (It is a lot of writing, but we make it fun by cheering them out as we write!)
 Here’s an example of cheering out the number word “two”:

Cheer Leader: “Give me a ‘t’”
Class: “t!”
Cheer Leader: “Give me a ‘w’!”
Class: “w!”
Cheer Leader: “Give me an ‘o’!”
Class: “o!”
Cheer Leader: “What does that spell?”
Class: “Two!”

We also mix it up by using different “voices” as we cheer… like a monster voice, a chicken voice, a football player voice, a crying voice, a sad voice, a happy voice, a British accent, a duck voice, a mouse voice, a ballerina, etc. (They will come up with some pretty fun ideas once they get going!)  I start as the “Cheer Leader” but once they get the idea, I have students take on that role. (They are always welcome to use a model!)


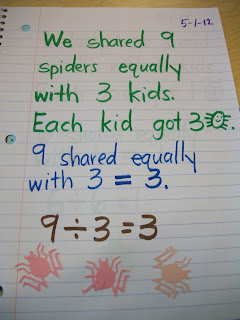
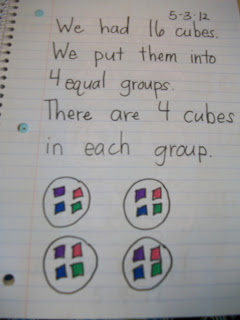
My students also do word problems, bar modeling, math journaling, and more all in their "Math Journal/Toolbox". The pictures below are just of the guided part of the process. We always come up with the definition and the example together as a class… it has allowed for some pretty powerful discussions! 

I hope they give you some ideas!!


This can be done with any shape... just another way to remember the concept of "whole" and "part".


When we start the teen numbers, we add in the ten frames.  We want to reinforce the idea of TENS and ONES in every way possible!!


  We start with a 50 Board.
  Amazingly, every single year, as we are filling in the chart for numbers 20-40, someone notices that the rows on the hundred chart match the number of tens and the individual boxes match the number of ones... YAY!  (Some years I start to get a little anxious, worrying that no one will say anything- but it never fails!)
 
For numbers to 100, we pretty much have the pattern figured out, we justdo a few to make sure we really understand how it works. (Some years we roll two dice to get the number we are working with, some years we have two different students just say a random number-- it doesn't really matter how you get them, just try and have a few of each.
You may also notice that on the last chart, I colored the lines vertically and on these, they are colored horizontally. First Graders should be exposed to both-- after all, they mean the same thing J


If you are interested, send me an email and I can share some of the fun with you! semvm0816@gmail.com
Just leaving a comment will not enable me to share the documents with you-- so be sure to send me an email! Teacher sharing is what makes this crazy job possible!!

After you try it out, come back and leave a comment to let us know how it went! :)

Have a SUPER day!
Sarah